At some point, almost every project reaches a painful milestone: you change one small thing — and suddenly something unrelated breaks.
Without unit tests, it’s hard to know whether the code still works. You can run the application manually, click through a few flows, and hope for the best — but that doesn’t scale. The more features the project has, the more time you spend on manual checks, and the easier it becomes to miss regressions.
Unit tests change that. They give you fast feedback, document expected behavior, and make refactoring much safer.
In this article, I’ll show a practical way to introduce unit tests into an existing C++ project:
- how to set up GoogleTest in CMake,
- how to structure test targets,
- and how to deal with dependencies using fixtures and mocks.
CMake Integration
CMake provides built-in support for integrating GoogleTest, but first you need to make GTest available on your system (via a package manager or by building it from source).
The integration steps are straightforward:
- use
find_packageto locate the GoogleTest package - create a separate test executable
- link your production library into that test executable
- register the tests with CTest using
gtest_discover_tests
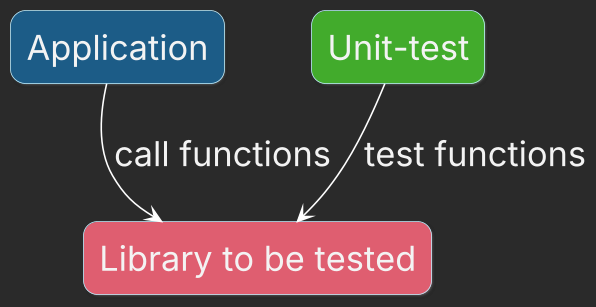
Unit tests are just a regular executable that links against your library, calls its functions with predefined inputs, and checks the results.
GoogleTest also provides a ready-to-use main() implementation that runs all registered tests. To use it, link the GTest::gtest_main target.
For example, the snippet below shows how to define a test target for the files-search library:
find_package(GTest REQUIRED)

# Add test executable
add_executable(files-search-tests
    DirectoryWalkerTest.cpp
    MatchSeekerTest.cpp
    SearcherTest.cpp
)

# Link required libraries
target_link_libraries(files-search-tests
    PRIVATE
        GTest::gtest_main
        files-search
)

# Enable private include directories for tests
target_include_directories(files-search-tests
    PRIVATE
        "${CMAKE_CURRENT_SOURCE_DIR}"
)

# Discover test cases and register them with CTest
gtest_discover_tests(files-search-tests
    PROPERTIES LABELS UNIT_TEST
)
With CMake integration in place, the next milestone is to start writing your first tests.
Tests for Isolated Functions and Classes
Some functions and classes don’t require any complicated setup—no file creation, no database initialization, and no external dependencies such as an HTTP server. Think of things like std::sqrt or a regular expression matcher. If the code performs a pure calculation or processes data from simple structures, it is a great first target for unit tests.
The workflow is simple:
- use GoogleTest’s
TESTmacro to define a test case, - call the function (or method) with predefined inputs,
- verify the result using one of the GoogleTest assertion macros.
Here is the simplest example: a unit test for std::sqrt:
#include <gtest/gtest.h>
#include <cmath>

TEST ( sqrtTest , correctValue ) {
  auto res = std::sqrt (9.0) ;
  EXPECT_FLOAT_EQ ( res , 3.0) ;
}
If you want more practical C++/CMake deep dives like this, I share one issue per month in my newsletter From complexity to essence in C++.
In real projects, the number of truly isolated functions and classes is usually limited. Soon you’ll encounter code that needs preparation before each test (temporary files, test folders, seeded data, etc.). That is exactly where GoogleTest fixtures become useful.
Prepare testing Environment with GTest Fixtures
Many classes are not “pure”: to test them, you often need to prepare some environment first. For example:
- create a temporary folder structure,
- generate test files,
- prepare input data,
- and clean everything up after the test finishes.
You can do this setup directly inside every test case, but that quickly becomes repetitive and error-prone.
GoogleTest solves this with fixtures.
A fixture is a class that:
- sets up the environment before each test,
- provides shared helper functions and common test data,
- and cleans up after each test.
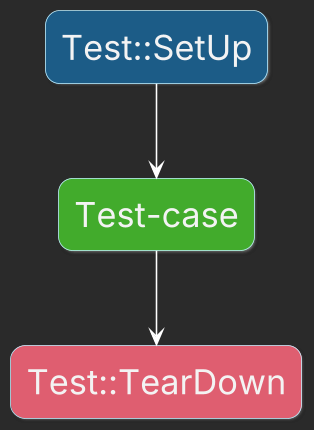
To define a fixture, create a class that inherits from ::testing::Test and implement SetUp() and TearDown().
GoogleTest calls SetUp() before each test and TearDown() after each test, even if the test fails.
If setup failed the test code must verify it. Absence of that check may lead to buggy code pass the checks.
Check precondition in
SetUpand post-conditions inTearDownwithASSERT_*macros to make the test-case failed.
For example, if the tested function findMatches does recursive search for a regular expression in a specified folder, the test-case setup defines a several files with different content:
namespace fs = std::filesystem;

class RecursiveSearchTest : public testing::Test {
 protected:
  // Set up testing environment
  // This method is used instead of a constructor, while in the constructor
  // isn't possible to add `ASSERT_*` macro to check if file and folders
  // are properly constructed
  void SetUp() override {
    // Generate rundom folder name
    auto folderName = "RecursiveSearchTest_" + std::to_string(std::rand());
    // Store generated name in the member for further usage
    RootTestFolder = fs::temp_directory_path() / folderName;

    ASSERT_TRUE(fs::create_directory(RootTestFolder));

    // Create folder with files
    ASSERT_TRUE(fs::create_directory(RootTestFolder ));
    {
      auto textFilePath = RootTestFolder / "text.txt";
      // Create a text file that will be then opened successfully
      std::ofstream textFile(textFilePath.native());
      // Check that file is opened
      ASSERT_TRUE(textFile.is_open());
      // Fill with content
      textFile << "one\n" << "two\n" << "three";
    }

    {
       auto textFilePath = RootTestFolder / "numbers.txt";
       std::ofstream textFile(textFilePath.native());
      ASSERT_TRUE(textFile.is_open());
      textFile << "123451\n" << "561223\n" << "178832";
    }
  }

  // Clean up step for each test-case
  void TearDown() override {
    auto cnt = fs::remove_all(RootTestFolder);
    ASSERT_GT(cnt, 0);
  }

 protected:
  fs::path RootTestFolder;
};
To use the fixture, write tests with TEST_F instead of TEST. For example, test-case refers RootTestFolder and checks if expected lines were returned:
TEST_F(RecursiveSearchTest, onlyNumbers){
   std::vector<std::string> res = findMatches(RootTestFolder, "\\d+");
  // Expect lines only from the file "numbers.txt"
   EXPECT_THAT(res, ::testing::ElementsAre(...));
}
Fixture members accessible in the test-cases must have
protectedaccess specifier.
With fixtures, each test starts from a clean, known state, and your test code stays focused on the behavior you want to verify rather than on boilerplate setup.
Want an end-to-end example of how to structure a real C++ project (architecture + CMake + testing workflow)?
I cover this in my book “No More Helloworlds — Build a Real C++ App.”
Mock Dependencies
In real code, many classes are not isolated. They depend on external systems such as payment providers, databases, file systems, or network services. These dependencies make unit testing harder because they introduce side effects, latency, and failure modes that are unrelated to the logic you actually want to verify.
A classic example is a class that talks to a payment gateway. For a unit test, you don’t want to send real payments. Instead, you want a controllable substitute that behaves exactly the way your test needs.
That’s where mocks help.
A mock is a test double that:
- implements the same interface as the real dependency,
- allows you to define expected calls,
- and returns predefined results.
GoogleTest provides GoogleMock (gmock) for this purpose.
Example: Payment gateway mock
First, define an interface:
class IPaymentGateway {
public:
    virtual ~IPaymentGateway() = default;
    virtual bool charge(int amount) = 0;
};
Now you can define a mock implementation:
#include <gmock/gmock.h>

class MockPaymentGateway : PaymentGateway {
  public:
    MOCK_METHOD(bool, charge, (int amount), (override));
};
Assume you have some business logic that depends on PaymentGateway:
class OrderService {
public:
    explicit OrderService(std::unique_ptr<IPaymentGateway> gateway)
          : gateway_(std::move(gateway))
     {}

    bool payForOrder(int amount) {
        if (amount <= 0) return false;
        return gateway_->charge(amount);
    }

private:
    std::unique_ptr<IPaymentGateway> gateway_;
};
Now the unit test can inject the mock and specify what should happen:
TEST(OrderServiceTest, SuccessfulPayment) {
    auto gateway = std::make_unique<MockPaymentGateway>();
    auto *mock = gateway.get();
    OrderService service(std::move(gateway));

    EXPECT_CALL(*mock, charge(100))
        .WillOnce(Return(true));

    EXPECT_TRUE(service.payForOrder(100));
}
This test verifies that CheckoutService calls charge(100) exactly once and correctly handles the returned value—without touching any real external system.
Rule of thumb
If a dependency:
- performs I/O,
- talks to the network,
- accesses the filesystem,
- or makes tests slow/flaky,
…mock it for unit tests and test the integration separately (e.g., with integration tests).
If you interested about more information about testring for the real project – that’s one of the core topics in my book – No More Helloworlds — Build a Real C++ App. Additionally I cover more topics about C++, multithreading and buildsystems in my monthly newsletter – From complexity to essence in C++.
Summary
It’s best to design an application to be testable from the beginning. But if you need to introduce unit tests into an existing project, a gradual approach works well:
- Add a dedicated test executable to your build system and register tests with CTest.
- Start with pure / isolated functions and simple classes.
- Move repetitive setup/cleanup into GoogleTest fixtures (
SetUp()/TearDown()). - Hide external dependencies behind interfaces and mock them in unit tests.
Don’t try to “add tests everywhere” in one big push. Create a plan and introduce tests in small milestones — that’s how you make progress without breaking delivery.
If you want a practical, end-to-end walkthrough of building a real C++ project (architecture + CMake + testing workflow), I cover this in my book “No More Helloworlds — Build a Real C++ App.”
And if you enjoy monthly deep dives on Modern C++, multithreading, and build systems, you can subscribe to my newsletter “From complexity to essence in C++.”